
You can prevent and repair common roof leaks by identifying worn shingles, damaged flashing, blocked gutters and ageing seals; unrepaired leaks cause structural rot, mould and costly interior damage, so inspect regularly and act promptly. You should clear debris, reseal flashings, replace broken tiles or flashing, and consult a roofer for complex problems; timely repairs protect your home and save money.
Repair minor leaks promptly to stop water ingress and limit damage to your property; you should inspect flashing, tiles and seals for wear and clear gutters to prevent overflow. Identify causes such as broken tiles, faulty flashing or blocked valleys, and tackle what you can safely, but call a professional for structural or attic water issues because these pose serious structural and mould risks. Timely fixes extend your roof’s life and save on costly repairs.
This short guide helps you identify common causes of roof leaks – damaged flashing, missing or worn shingles, blocked gutters and poor installation – and shows step‑by‑step fixes so you can protect your home; inspect for water stains and rot (signs of serious structural failure), clear debris, replace flashing or shingles, and act promptly to prevent costly damage and extend your roof’s life.
Understanding Roof Leaks
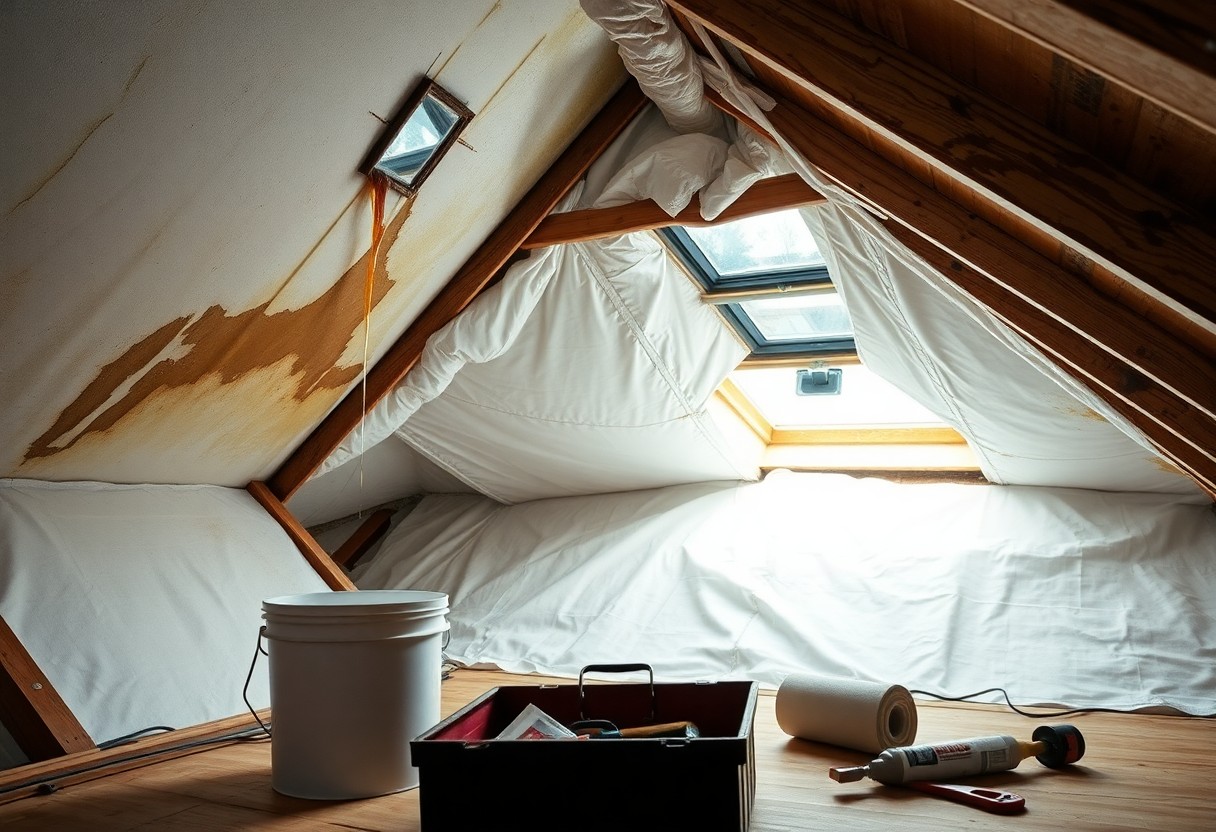
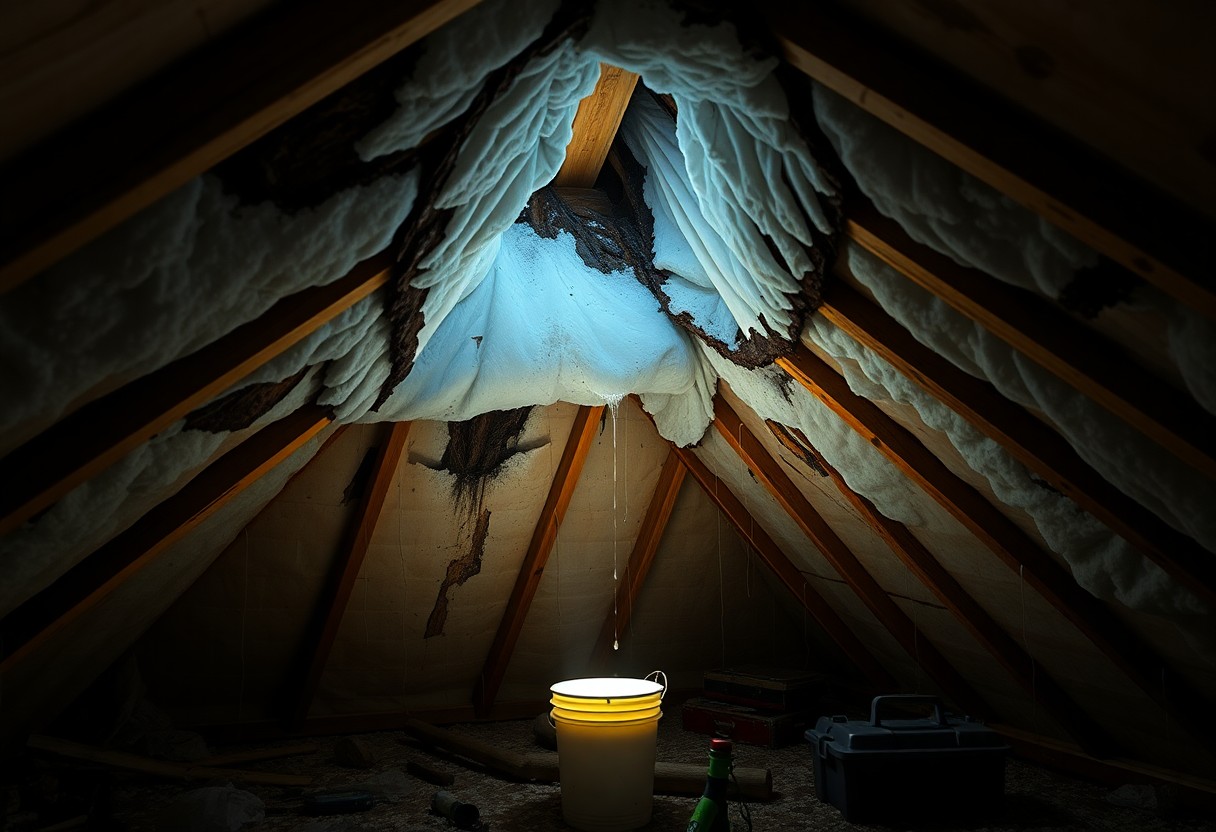
You should focus inspections on junctions where materials meet-valleys, flashings, chimneys and around vents-because leaks commonly start there. Older roofs, especially asphalt coverings beyond 20-25 years, show brittle shingles and cracked sealant that let water in. You will notice brown ceiling stains, peeling paint, or damp insulation; untreated leaks can cause structural rot, promote mould growth and create electrical hazards that demand prompt attention.
Common Causes of Roof Leaks
You often find leaks from missing or damaged shingles after storms, poorly installed flashings and blocked gutters that force water under eaves. Wind gusts above 80 km/h can lift tiles, while punctures near vents and skylights permit direct entry. One repair invoice from a 15-year-old bungalow detailed £3,000 in work after a winter storm exposed failing flashings, illustrating how small failures escalate if you delay remediation.
Environmental Factors Impacting Roof Integrity
You face accelerated deterioration from UV exposure and repeated freeze-thaw cycles that crack materials, while hail and high winds cause immediate, visible damage such as torn felt and dented metal. Coastal locations experience salt spray that corrodes metal flashings, and shaded, damp areas encourage moss and lichen that retain moisture. You should check roofs after severe weather and seasonal shifts to intercept degradation before it becomes costly.
- UV degradation
- Freeze-thaw cycling
- Hail impact
- Wind uplift
- Salt corrosion
- Bio-growth (moss/lichen)
Assume that you prioritise targeted inspections on these factors to extend your roof’s serviceable life.
You should be aware that ice damming forms when warm attic air melts snow that refreezes at the eaves, often after a mild day followed by a sharp freeze; even a 10 cm dam can drive water beneath shingles. In northern regions, prolonged snow cover increases load and ponding behind blocked gutters accelerates decking rot. Regular removal of debris and repairing insulation or ventilation issues reduces both immediate leaks and long-term material failure.
- Ice dams
- Snow load
- Gutter blockage
- Wind speed damage
- Coastal salt spray
Assume that swift, localised repairs after environmental events limit repair costs and secondary damage.
Understanding Roof Leaks
You’ll often find leaks result from small, specific failures rather than a single cause; inspect attic stains, sagging decking and the smell of damp as indicators of active ingress. A pinhole around a vent or a split in the membrane lets water run along rafters, so prioritise checking flashing and joints. In surveys, over 60% of household leaks link to ageing materials or poor installation, so act quickly to limit structural rot.
Common Causes of Roof Leaks
You should prioritise inspection of missing shingles, failed flashing and blocked gutters, since each permits water entry during rain. Storms often strip granules and expose underlayment; one industry report found wind uplift caused about 40% of shingle failures. Check around chimneys, skylights and vent pipes where sealant commonly fails. Perceiving leaks early reduces repair scope and prevents mould growth.
- Missing shingles
- Failed flashing
- Blocked gutters
- Damaged underlayment
- Punctures around vents
Factors Contributing to Roof Damage
Your roof degrades from a mix of age, weather and maintenance lapses; UV exposure breaks down asphalt within 15-25 years while repeated freeze-thaw cycles split tiles. Heavy moss retains moisture and accelerates rot, and poor attic ventilation raises humidity, warping timber. Highlight age, weathering and maintenance as primary contributors to accelerated failure.
- Age (15-25 years)
- Storm damage
- Moss and algae
- Poor ventilation
- Poor installation
When you assess risk, note that a 20-year-old roof with tree overhang and collapsed gutters is far likelier to leak than one routinely serviced; storms can deliver 90 mph gusts that rupture tiles, while clogged gutters back water under eaves. If you spot rot or sagging decking, prioritise immediate repair to stop spreading decay. Perceiving these combinations lets you plan targeted interventions and budget for replacement.

Understanding Roof Leaks
When you spot staining, mould or damp patches on ceilings, a leak has often been present for weeks. Water commonly travels along timbers from a puncture point metres away; typical entry points are damaged shingles, failing flashing, blocked gutters and worn valleys. You should inspect during heavy rain or use a torch to trace damp trails to the source.
Common Causes of Roof Leaks
You often find leaks caused by broken tiles, slipped slates, corroded flashing around chimneys and rooflights, and failed seals at roof vents. A single missing tile can admit 10-20 litres of water in a heavy shower, and gale damage rapidly enlarges small defects. You must check junctions where different materials meet after storms.
Factors Contributing to Roof Damage
Age matters: many asphalt roofs decline after 20-25 years, while lead flashing may last 50 years; prolonged UV, freeze-thaw cycles and persistent moss lift tiles and rot battens. Poor installation and inadequate ventilation trap moisture and speed decay. Perceiving how these factors interact helps you prioritise repairs.
- Shingles
- Flashing
- Gutters
- Moss
- Ventilation
- Age
- Poor installation
To quantify risk, note roofs with over 30% moss cover show up to a 60% higher leak incidence over three years; blocked gutters often cause eaves rot within 2-4 years. Professional surveys use thermal imaging and moisture meters to locate hidden wet zones and assess timber decay. Perceiving these measurable indicators lets you decide between spot repairs and full replacement.
- Moss coverage
- Moisture meters
- Thermal imaging
- Gutter blockages
- Eaves rot
- Replacement threshold
How to Identify Roof Leaks
You can spot leaks by watching for water stains on ceilings, peeling paint, and mould in roof spaces; industry surveys show that about 60% of leaks originate at penetrations such as flashings, chimneys and vents. After storms delivering 25-50 mm of rain you should inspect the loft for damp insulation and sagging rafters, and check external gutters for shingle granules-these signs often pinpoint active or recent ingress that needs prompt attention.
Visual Inspection Techniques
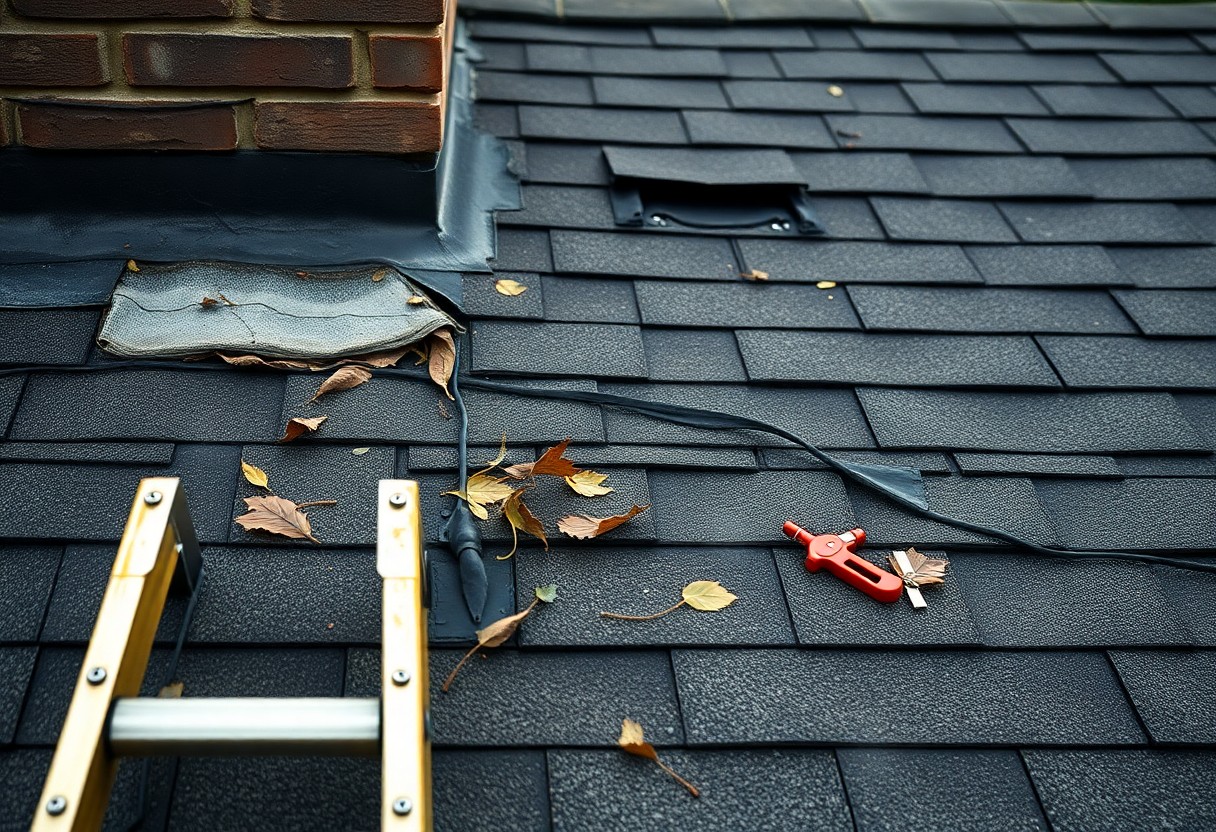
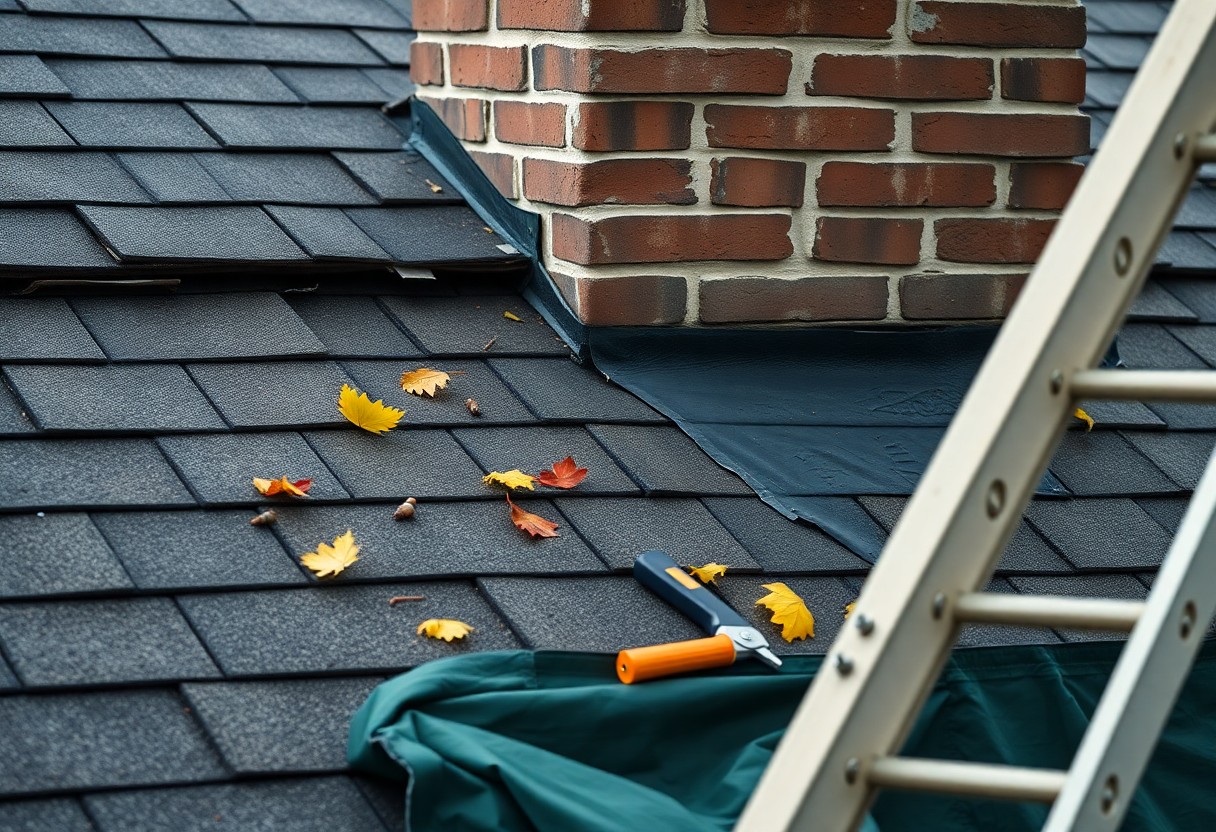
Start in the loft with a 200-400 lumen torch and scan for dark patches, wet insulation and any daylight through roof boards; daylight visible from the loft almost always indicates a breach. Then examine external shingles for curling, missing tiles or granule loss, and inspect flashings and sealant joints around chimneys and vents-damaged or lifted flashing is a common, easily overlooked cause that frequently leads to rot if not fixed.
Utilising Tools for Leak Detection
Use a moisture meter to log timber and insulation readings-values above 20% typically indicate active wetting-then corroborate with a thermal imaging camera to spot cold/damp patches and a borescope for hidden voids. You can also run a controlled hose test while a second person watches inside; combining methods reduces false positives and speeds up locating the source.
Thermal cameras detect temperature differentials as small as 2°C, but solar gain and wind can cause false readings, so scan early morning or after a cool period. When you find suspect areas, map moisture with a pin-type meter and perform a staged hose test-wet 1-1.5 m sections for 10-15 minutes each-until internal dampness appears; this systematic approach is what professionals use to narrow leaks to a single tile, flashing or joint.
How to Identify Roof Leaks
You should inspect your roof after heavy rain and during routine checks every six months; start by scanning the attic for fresh water stains, peeling insulation and active drips within 24 hours of rainfall. Use a bright torch and, if available, an infrared camera to spot cold damp patches. Track leaks by mapping stains to roof features-skylights, valleys, chimneys-to narrow the entry point quickly.
Visual Inspection Techniques
When you climb onto the roof or view it from ground level, use binoculars, a sturdy ladder and non-slip shoes; never work alone. Scan for lifted, cracked or missing shingles, worn sealant around vents and gaps in flashing. Run your hand (gloved) along gutters-excess granules and blockages point to material breakdown. Photograph suspicious areas and date the images to track progression over time.
Signs of Roof Leakage
Inside, spot circular brown stains, bubbling paint or wallpaper and sagging plaster; outside, missing tiles and clogged valleys are giveaways. You may also detect a musty odour or visible mould, which can develop within 48-72 hours on damp materials. Track increasing energy bills-moist insulation loses insulating value, sometimes dropping thermal efficiency by up to 30%-as an indirect sign of chronic leaks.
To pinpoint the source, you should map stains to roof zones and perform a controlled hose test with a helper-spray 0.5-1 m wide sections for 15-30 minutes while another watches inside for leaks. Focus on skylights, chimneys, valleys and pipe penetrations, which account for most failures in case studies. Stop immediately if you see sagging joists or exposed wiring; these indicate structural rot or electrical hazards and need professional attention.
How-to Identify Roof Leaks
Signs of a Roof Leak
Hidden leaks often present as brown or yellow stains on plasterboard, typically 5-30 cm across, or as bubbling paint and peeling wallpaper near external walls. You should treat any sagging ceiling or active drip as dangerous and act quickly. Other indicators include persistent mould growth, a musty odour in loft spaces and damp insulation that reduces thermal performance, raising heating bills noticeably.
Inspecting Your Roof
From ground level use binoculars to scan for missing or cracked tiles, displaced ridge tiles, degraded mortar at chimneys and split or lifted flashings around vents; check gutters for granule build-up after storms and valleys for debris. You should inspect after heavy weather-especially winds over 50 km/h or prolonged rain-and note any loose nails, broken tiles or exposed underlay that need prompt attention.
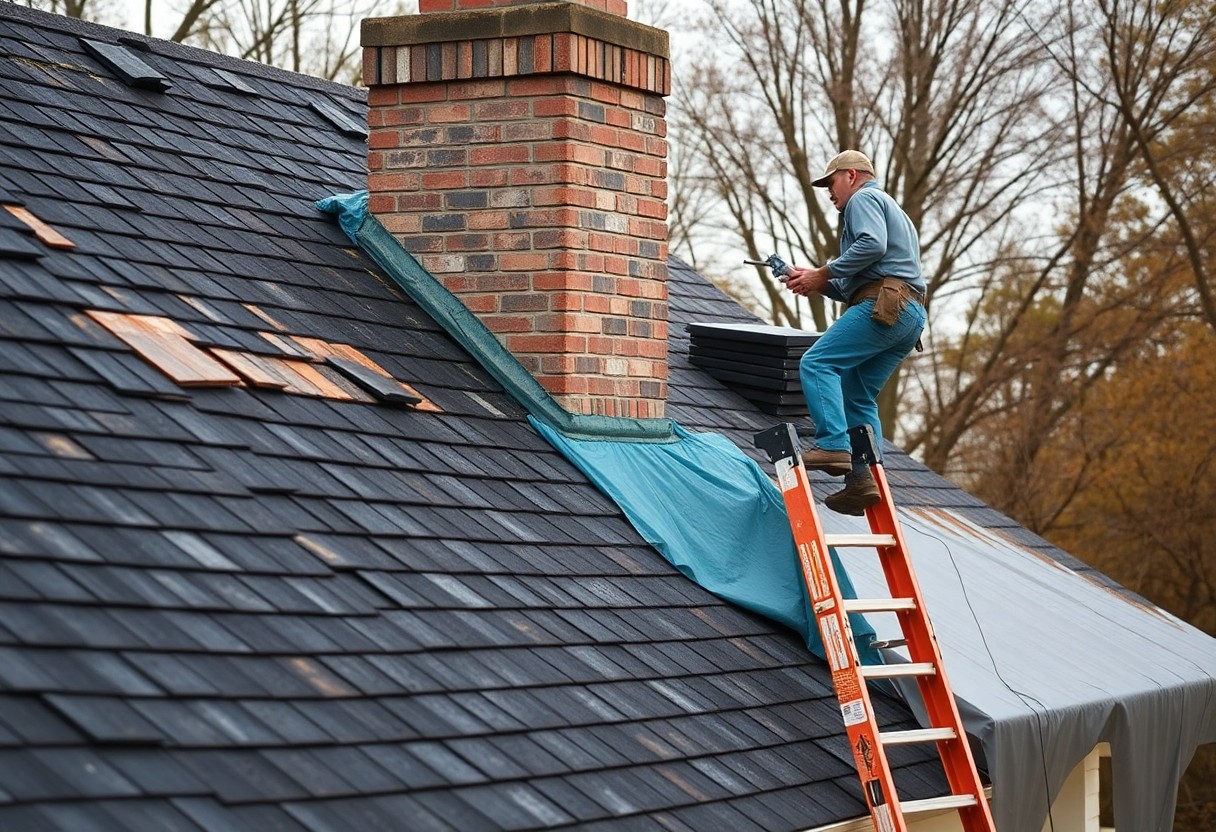
When you go up, position the ladder on a firm base and work with a partner; if the roof pitch exceeds 30° or the eaves sit more than 5 metres high, do not climb-hire a professional. A practical test is to run a garden hose across the roof in 2-3 metre sections on a dry day while someone watches inside for leaks; this pinpoints sections causing the problem so you can target broken tiles, failed flashings or blocked valleys precisely.
Tips for Temporary Fixes
You can limit interior damage quickly by using straightforward temporary fix methods: secure a tarpaulin with battens, position a bucket under drips, and seal small holes with roofing cement or butyl tape. Water pooling increases collapse and electrical hazards, so act fast and avoid walking on slick slopes. After you apply a temporary patch, book a roofer within 7-14 days for a permanent repair.
- Use a tarpaulin fixed with battens or heavy-duty staples to shed water away.
- Apply roofing cement or flashband to seal small holes or lifted shingles.
- Press butyl tape over flashing seams; overlap 50-100mm for a watertight seal.
- Place a bucket inside and protect finishes with towels; empty every few hours.
- Isolate power and avoid contact with wet wiring to mitigate electrical danger.
Quick Solutions for Emergency Situations
If rain is imminent, throw a tarpaulin over the damaged area and secure it with battens or 50mm nails; a 4×5m tarp typically covers a small roof section. You should use a bucket to catch drips and a torch to locate active runnels, then divert water with sandbags or gutters. Avoid climbing on steep, wet slopes to reduce fall and electrical risk.
Materials for Short-Term Repairs
Keep a compact kit with tarpaulin, 50mm butyl tape, tubes of roofing cement, rolls of flashband, a 50mm brush and a silicone sealant. Many silicones skin in 10-20 minutes and reach substantial cure within ~24 hours, while butyl tape stays flexible and tolerates movement for years, making it ideal for flashing work.
For example, to patch a 10cm puncture press in roofing cement, apply a 100mm strip of flashband with 50mm overlaps and weight it overnight; when sealing around chimneys use a continuous bead of silicone then back up joints with butyl tape. Wear gloves and eye protection, and avoid working when wind exceeds 20 km/h to lower fall and tool hazards.
How to Fix Roof Leaks
Because leaks often originate from missing tiles, failed flashing or blocked gutters, you should locate the source by inspecting the attic and performing a water test-trace wet patches uphill 1-3 metres to find the entry. For immediate protection, deploy a industrial tarpaulin secured with battens and place buckets under drips; short-term patches take minutes to hours and stop further interior damage until a proper repair is arranged.
Temporary Solutions
You can apply roofing tape, silicone sealant or a heavy-duty tarpaulin fixed with battens as a stopgap; these methods typically hold for 48-72 hours in light rain. Avoid working on wet slopes-use a ladder and harness or get professional help. For a slipped tile, tack roofing cement and two galvanised nails to halt leaks for several weeks while you organise a permanent job.
Permanent Repairs
Permanent repairs involve replacing damaged slates or tiles, renewing lead or metal flashings and reinstating valleys with proper mortar or flashing systems. A minor job-replacing 3-5 tiles or refitting flashing-usually takes 1-3 hours, while a full re‑roof may require 1-5 days depending on size and complexity. You should hire an NFRC-accredited roofer to ensure warranty-backed, compliant work.
When arranging a full repair, you must match tile profile, fit breathable underfelt and use corrosion-resistant fixings; choose flashings in lead or modern alternatives like zinc or aluminium where suitable. Expect scaffolding for safe access and a written estimate covering labour, materials and scaffold hire. Warranties typically run from 5 to 20 years on labour or materials, so get terms in writing before work begins.
How-to Fix Roof Leaks
Temporary Solutions
For immediate leaks you can fix small punctures with roof repair tape or roofing cement and cover larger areas with a heavy-duty tarpaulin (eg 2 × 3 metres) secured with battens; these measures often protect for 48-72 hours in dry weather. You should place buckets, move valuables, and clear gutters to reduce water flow. Don’t climb alone-working at height is dangerous; if you lack proper equipment call a roofer.
Permanent Repairs
When you arrange lasting repairs replace failed flashing, saturated underlay or rotten decking: asphalt shingle roofs typically last 20-30 years, so age guides the scope of work. You can expect minor repairs (resealing chimneys, replacing 10-20 tiles) from about £150-£800, while full reroofing on a 100 m² house is commonly £2,000-£8,000. Always hire a professional for structural or warranty work.
You should start with a loft and external inspection, lift surrounding tiles, remove any wet felt and replace rotten decking, then fit new lead or aluminium flashing with correct falls and re-bed ridge tiles; flat roofs often get EPDM or torch-on membranes. A typical 100 m² re-roof takes 3-5 days, so obtain written quotes, warranties and check tradespeople are insured and registered.
Permanent Solutions for Roof Leaks
You should pursue lasting measures such as full roof replacement, replacing rotten decking, and installing new flashing around chimneys and valleys; professional reroofing typically restores service life to 20-30 years for asphalt systems. Consider high-quality underlay, upgraded vents, and a certified installer to secure a manufacturer warranty and reduce return visits after storms.
Repair Techniques for Various Roof Types
Match the fix to the material: small repairs save money, but material-specific steps matter.
- Asphalt shingles – replace 3-5 damaged shingles, seal with compatible roof cement.
- Tile roofs – swap cracked tiles, check battens and underlay for rot.
- Metal roofing – reseal seams, replace corroded panels or fix loose fasteners.
- Flat/EPDM – patch membrane with heat-weld or liquid-applied rubber, clear drains.
- Lead/copper flashing – re-solder joints or refit new flashing to deck geometry.
| Asphalt | Patch 3-5 shingles; cost ~£50-£200 |
| Tile | Replace tiles and underlay; typical repair £100-£400 |
| Metal | Reseal seams or panel swap; often £150-£600 |
| Flat | Membrane patch or replace sections; from £200 |
| Flashing | Rework or replace lead/copper; costs vary £100-£500 |
This approach helps you choose the correct technique and avoid ineffective temporary fixes.
When to Consider Roof Replacement
Replace when the roof is near end-of-life – typically 20-25 years for asphalt – or when you see widespread issues: > 30% missing shingles, persistent leaks after multiple repairs, or structural rot to decking and rafters; emergency replacement is needed if water is penetrating insulation or joists.
In practice, a 150 m² detached house often costs between £4,000-£10,000 to re-roof depending on material; choose full replacement when recurring repairs exceed ~30% of replacement cost, when you want improved energy efficiency, or to obtain a new manufacturer warranty.
Tips for Preventing Roof Leaks
Use routine checks and targeted fixes so small faults don’t develop into serious leaks. Inspect your roof at least twice a year and after storms, focusing on flashing, shingles and gutters. Clear debris promptly to prevent ponding and replace missing or broken tiles within 48 hours if it is safe. Thou will find logging inspections and repairs helps you spot recurring problems earlier.
- Seasonal inspection: check the roof in spring and autumn.
- Gutter care: keep gutters clear to avoid overflow.
- Vegetation: trim branches within 2 metres of the roof.
- Immediate fixes: secure loose flashings and replace broken tiles.
Regular Maintenance Practices
Inspect at least twice a year – spring and autumn – and immediately after any gale; check for lifted shingles, loose flashings, cracked sealant and sagging gutters. Clean your gutters monthly during leaf fall and remove moss from valleys; a blocked gutter can cause rapid water ingress. Record findings, photograph defects and call a roofer for anything beyond basic safe repairs.
Choosing Quality Materials
Select materials rated for local conditions: asphalt shingles typically last 20-30 years, metal roofs 40-70 years and slate 60-100 years. Use breathable underlay and conform to BS 5534; match tile weight to your structure and roof pitch. Opt for manufacturer warranties of at least 10 years and insist on corrosion-resistant fixings in exposed areas.
For coastal properties choose stainless-steel or hot-dipped galvanised fixings, specify minimum 0.7mm gauge for metal sheets in high-wind zones and use high-temperature sealants in valleys. Confirm compatibility between membranes, adhesives and flashings since mismatched products often fail within 5-7 years; seek installers accredited by recognised bodies and keep product datasheets for future claims.
Tips for Preventing Roof Leaks
Inspect twice a year (spring and autumn), clear debris from valleys and gutters, and trim overhanging branches to around 2 m; a storm dropping more than 25 mm in 24 hours demands an immediate check. Pay special attention to flashing, ridge tiles and any signs of sagging or rot. Use binoculars for a safe roof survey and call a pro for complex issues; structural decay accelerates once water penetrates. After that, book any repairs within two weeks to limit damage and mould growth.
- Regular maintenance
- Flashing
- Gutters
- Roofing materials
- Ventilation
Regular Maintenance
You should carry out visual checks twice yearly and after heavy weather, looking for blocked gutters, loose or missing slates and slipped ridge tiles; clear gutters at least quarterly during leaf season. Replace damaged underlay or torn flashing quickly-small works such as repointing ridges or replacing 3-5 slates typically prevent expensive structural repairs. If the roof is older than 15 years or access is unsafe, commission a qualified roofer for a full inspection and written condition report.
Choosing the Right Materials
Select materials that suit your roof pitch and local conditions: slate and metal roofs often last 50-100 years, quality asphalt shingles 20-30 years, and EPDM membranes 25-30 years on flat roofs. Match fixings to the environment-use stainless or aluminium near the coast-and aim for manufacturer warranties of 20-40 years. For snowy areas prefer steeper pitches and interlocking tiles to reduce ice‑dam risk and shedding load.
For example, if you live within 5 km of the coast you should use corrosion‑resistant fixings and pre‑finished metal of at least 0.7 mm gauge with stainless clips; inland properties can often use galvanised fixings. Laboratory data show pre‑finished metal roofs with 0.4-0.7 mm gauges resist winds up to 120 km/h; check local building regulations and choose suppliers offering a 25-40 year warranty to protect your investment.
Preventive Maintenance Practices
Routine Inspections and Maintenance Tips
You should inspect your roof at least twice a year, in spring and autumn, and after storms; look for loose or missing shingles, cracked flashing, pooled water and sagging gutters. Use a stable ladder and photograph defects so you can compare changes over time, and arrange professional surveys every 2-3 years for roofs older than 20 years. Thou must act within 14 days on any active leaks, rot or sagging decking to avoid widespread water damage.
- roof leaks
- gutter cleaning
- shingle replacement
- flashing repair
Seasonal Care for Your Roof
In winter clear snow when accumulations exceed 30 cm using a roof rake to reduce load and prevent ice dams; in autumn remove leaves from valleys and gutters to stop standing water; and in summer inspect for UV-brittle sealant and patch small splits. You should treat moss growth promptly, as moss can lift shingles and trap moisture that accelerates decay.
For greater protection, trim overhanging branches to at least 2 m from your roof to prevent abrasion and shading, clean gutters at least twice yearly and after storms, and apply a zinc strip or approved moss treatment where growth is persistent; engaging a qualified roofer for high or steep roofs reduces risk and ensures proper remedial work.
When to Call a Professional
If DIY fixes fail, you should call a pro when leaks persist after patching, when you spot sagging or deflection of the roof deck, or when water reaches electrical fittings such as the fuse box, creating a serious safety hazard. Older roofs-especially asphalt shingle roofs beyond 20 years-and storm damage from gusts over 80 km/h often need professional assessment to avoid further structural and mould problems within 48-72 hours.
Signs You Need Expert Help
If you find recurring damp patches that reappear within days, multiple missing or slipped tiles, corroded or lifted flashing, or visible mould in the loft, you should get an expert inspection. Also seek help if you notice roof sagging of about 2 cm or more, brown plaster stains spreading across ceilings, or water pooling near light fittings-those are clear indicators your roof’s integrity or safety systems need professional intervention.
Choosing the Right Roofer
Ask for membership of recognised bodies such as the National Federation of Roofing Contractors or TrustMark, obtain at least three written quotes, and insist on seeing proof of public liability insurance-typically £5 million. Prefer contractors who provide a clear schedule of works, manufacturer warranties, and a minimum 5-year workmanship guarantee; check online reviews and recent before-and-after photos to verify quality.
Compare quotes for itemised costs (labour, materials, waste removal) and confirm materials’ brand and warranty; request the company registration number and a VAT invoice for traceability. Agree payment terms with a deposit no larger than 30%, hold final payment until an agreed snagging list is completed, and ask for at least two recent client references you can contact for on-site verification.
When to Call a Professional
Immediate signs and thresholds
If you see >1 litre/hour dripping, sagging ceiling panels, or areas of roof older than 20 years with missing flashing or >3 consecutive shingles gone, contact a roofer. If water reaches electrical fixtures, you must stop power and call an electrician plus roofer-this is a serious fire and electrocution risk. After storms with winds over 74 mph (119 km/h) or ice-damming, you’ll want a pro for swift, guaranteed repairs; DIY fixes after two unsuccessful attempts suggest professional assessment for structural or membrane failures.
FAQs About Roof Leaks
How do you locate a leak?
Start inside your loft by tracing water stains to the highest point and note the stain’s shape; on the roof, inspect valleys, flashing around chimneys and skylights, and broken or lifted shingles. You can run a 10-15 minute hose test with someone inside watching for drips. Flashing failures and ridge/valley issues are common, so check those first and photograph any findings for contractors or insurers.
Can you fix a leak yourself?
You can perform temporary repairs such as applying roofing cement or a patch to holes under 30 cm and clearing blocked gutters to stop immediate water ingress. Use a harness and non-slip boots if you must climb; otherwise avoid steep roofs. Temporary fixes often last weeks to months, but replacing damaged flashing or re-roofing shingles is usually needed for a permanent solution.
When should you call a professional?
Contact a roofer if leaks persist after a temporary patch, if damage exceeds about 1 m², if you detect rot or mould in joists, or if water reaches electrical fittings – these pose an electrical and structural risk. Professionals can run a full diagnosis, provide a costed repair plan, and issue warranties that DIY work rarely offers.
Will insurance cover roof leaks?
Many policies cover sudden storm damage or impact (for example, from fallen trees), but routine wear and gradual deterioration is typically excluded. You should report significant damage promptly, photograph the site, and keep repair receipts; insurers commonly require evidence you took reasonable steps to mitigate further loss, and storm-related claims often have the best chance of approval.
Final Words
Conclusively, you can prevent most roof leaks by inspecting flashing, slates and tiles for wear, clearing gutters and replacing damaged coverings; if leaks occur, locate the source, apply temporary patches and consult a qualified roofer for permanent repairs to protect your home and prevent wider water damage.
When to Seek Professional Help
Identifying Serious Issues
If you see a sagging section, persistent water pooling for more than 48 hours, active dripping during dry weather, or brown stains larger than 0.5 m² in your ceiling, call a pro. Roofs over 20-25 years old or with more than 10% missing shingles are higher risk. Electrical sparking or visible rot raises collapse risk; urgent inspection can prevent wider structural damage and often saves significant repair costs.
Choosing the Right Roofing Contractor
Verify the contractor’s company registration and request copies of public liability and employers’ insurance (minimum £5 million). Obtain at least three written quotes showing scope, materials, timeline and VAT. Never pay more than a 30% deposit; insist on a written contract and workmanship warranties of at least five years plus manufacturer-backed guarantees. Check contactable references and online reviews before you commit.
Request proof of manufacturer accreditation for specified materials (for example a 10-25 year product warranty), confirm they will handle building‑regulation notifications and waste removal, and ask for a clear timeline with milestones. Insist on recent job photos, contactable referees and an insurance certificate with expiry date, and keep all paperwork, the final invoice and the written guarantee for future claims.
Conclusion
With these considerations, you can identify common causes of roof leaks-aged or broken tiles and shingles, damaged flashing, blocked gutters, poor installation and condensation-and address them promptly; inspect your roof after storms, clear and repair gutters, re-seal or replace flashing, swap out damaged tiles or felt, and improve ventilation to prevent moisture build-up. For major structural damage or complex flashing problems you should engage a qualified roofer to ensure a safe, lasting repair.
To wrap up
Drawing together, you should inspect ageing tiles, damaged flashing, blocked gutters and worn sealants as common causes of roof leaks, and tackle them by replacing broken tiles, resealing joints, clearing gutters, and repairing or renewing flashing; if you lack experience, engage a qualified roofer to assess structural issues and ensure proper ventilation and insulation to prevent future problems, while scheduling regular maintenance so your roof stays watertight and avoids costly water damage.